Electrical
An AC2Car circuit primer
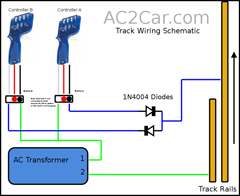
The heart of the AC2Car system is a simple AC2Car electrical circuit that you can put together at home to run two cars in a common slot with independent control. It is very inexpensive and easy to do. But, you must follow the two circuit schematics carefully in regard to the positioning of the diodes in both the circuit for the controllers and the cars. This page contains the technical information you will need to wire a track and set up cars for running two cars in one slot with independent control. Below you will find a component list, transformer suggestions, and controller information. Below that are both the controller wiring schematic, and the car wiring schematic that you will need to set up an AC2Car circuit.
Components needed to set up the AC2Car Electrics
- A slot car track of any kind to test the AC2Car electrical circuit, or a custom track routed using the unique AC2car slot pattern to get the full benefits of the AC2Car system.
- 2 non digital slot cars
- Two controllers
- 1 AC train transformer
- 4 diodes, one per controller
- The Track Wiring Schematic
- The Car Wiring Schematic
The Track
Any track can be used to experiment with the benefits of AC2Car electrics. Although they will not be able to pass, you can even use plastic snap together track to test two cars running in the same slot with independent control. Hook up the track with two controllers and diodes closely following both the Controller Wiring Schematic and the Car wiring Schematic below. However, a home routed wood track designed using the AC2Car pattern of slots, will give you all the many benifits of the AC2Car system of racing. With two cars racing in a common slot, there must be a way to pass cars ahead. This unique pattern of cutting slots should be used in the design of any AC2Car track, because a track with lane changing features for passing and blocking is required to get the full benefits of the AC2Car system. See Lane Changing page for details. A custom routed track using the slot pattern shown on the Track Building page, will allow all the cars racing to change lanes into a second slot cut for it around the track.
The Cars
Any common non digital slot car can be used to get two cars running in one slot with independent control. Add a diode to each car as shown in the car wiring diagram to run two cars independently controlled sharing a common slot. Note that any car without a diode can run perfectly on an AC2Car track. That means that any friends visiting can put their box stock cars on your track and race. However, if two cars share the same slot as Car A and Car B then inexpensive diodes must be installed in each car. It is important to note that the polarity of the B car must be reversed at the shoe.
The AC Transformer
Any old AC toy train transformer will work to power the AC2Car system. Note that many modern trains use DC power supplies. Modern pulse width modulating transformers do not work. The old fashioned style of variable speed train transformers from the 40’s to the 70’s work best. After much testing we found that a transformer rated to run higher than 18 Volts is best. You can find Lionel transformers on Ebay for around $35. The inexpensive AC train transformers that work well are from the old style “O Gauge†and “O-27†type trains, such as Lionel, American Flyer, and Marx. Choosing the Wattage level of a transformer depends on how many race cars you are going to run. Follow the guidelines below.
For All Tracks
We suggest Lionel (#1033) 90 Watt, or Lionel LW or SW 125 Watt transformers. For the best source of rebuilt, tested and warranted transformers go to www.lioneltransformer.com
- 90 Watt or higher.
- Variable 0 to 18 volts minimum.
- We suggest Lionel (#1033) 90 Watt, or Lionel (LW-125) 125 Watt.
Most stock Scalextric motors draw a 2 Amp stall current, so at AC2Car’s 50% duty cycle you are still looking at around 1Amp. At 1Amp per car X 6 cars ~ 6Amps. 6Amps X 12Volts ~ 72watts. So at minimum, you need over 70 watts to run 6 cars efficiently. Jimmy runs a 90 watt transformer for 8 cars, but it doesn’t seem to have enough power when we run cars with higher amp after market motors. Or, when we run cars faster at higher than 12 volts. I would recommend a 90 Watt or higher transformer.
DC Power Supply Method
It is also possible to generate the AC track signal for your track using a DC power supply and some off the shelf electronics. This is useful if you can’t source a Lionel transformer or the power grid where you live just can’t support the 120V 60Hz requirement that the Lionel transformers need to work. You only need a few things to use this method.
- H-Bridge Controller -Â We recommend at least 10 AMP capacity H-Bridge Controller that is capable of a voltage range of 10-20 volts. This model is suitable for most 4-6 Car tracks:Â Â VNH2SP30 Motor Driver Carrier
- Microcontroller Board -Â We recommend using an Arduino microcontroller board to drive the H-Bridge:Â Arduino Leopard
- DC Power Supply – You should use the power supply that you are currently using for you own track.
- Software for the Arduino – You can download the software from:Â AC2Car Track Driver Software
After you obtain the items in this list you can follow this guide to install the software onto the Arduino controller: Loading a sketch into the Arduino
The Controllers
Any slot car controller will work with AC2car electronics. However it’s important to note that with any controller, when running two cars in one slot with AC2car electronics, brakes must be disabled. Never connect the red lead of the controllers to the track terminal unless that line is disconnected beneath the layout. This is because on conventional DC tracks the controller is designed to short the circuit upon release of the trigger. This short is built into modern controllers to resist the spinning of the coasting car’s armature to simulate braking. But in the AC2Car circuit it shorts both A car and B car in that lane. Again, unhook the red lead from the controller, or disconnect the red line between the terminal and the track in the wiring beneath the layout to negate shorting out a car’s current flow when the controller trigger is fully released. Also note, that modern controllers like the excellent Professor Motor models need to have their polarity easily reversed to be able to be used to control the B car in the lane. Since they do not use wire wound resistors, these positive polarity controllers do not allow current to flow backwards through them unless the black and white leads are switched. This is important for the AC2Car circuit, because car B has it’s polarity reversed and current cannot flow backwards through this type of controller. To use a non wire wound resitor type controller as your B controller, simply connect the black controller lead to the white terminal and the white lead onto the black terminal to reverse the current flow. To simplify things, this can be done in the track wiring beneath the layout at each B controller.
Diodes
Nearly any diode will work in an AC2car circuit. The diode easiest to find is the 1N4004. Note that the diode has a gray band that signifies the direction of current flow. The current flows toward the silver band. You can think of the diode as a check valve. It allows current to flow in one direction, but not the other. The Controller Wiring Schematic, and Car Wiring Schematic below clearly show in what direction the diode should be soldered for the controllers and the cars to work correctly. The sequence of the diodes is most important. Building this circuit is very simple unless you place the diode in wrong. If so the cars will run in the wrong direction or not at all. You must follow the diagram for AC2Car electronics exactly, noting the direction of the gray band on each diode carefully. Once you do it, you will see how easy it was to do. Each controller will need a diode in either it’s black or white line.(see Controller schematic) Note that cars racing with no diodes will run well. But when a second car is introduced to the same lane a diode must be installed in both cars. But if you want to add a second controller, (controller B) to run a second car (car B) in the same slot, you must put one diode in both Car A and Car B sharing that lane, and reverse the polarity at car B’s guide shoe.
You can buy diodes from most electronics supply stores including:
- Digikey Part# 1N4004FSCT-ND
- Jameco Part#35991

Track and Car Wiring Schematics
You can view the track and car wiring schematics online in a jpeg format, or if you would like to print them out, we suggest downloading the pdf. The pdf files are formatted to fit the schematic onto one page. All wiring diagrams are set up for POSITIVE polarity connection.
Track Wiring
Use this schematic to wire your track. This wiring diagram will work for both traditional wire wound resistor controllers and diode style controllers. We have tested with PM transistor type controllers and they work as well. We have no tested full electronic controllers like the new Slot-it controller.
Track Wiring Schematic (Click to Download PDF)
Car Wiring
Use this schematic to wire your cars. Both A and B car wiring diagrams are contained in the pdf.
Car Wiring Schematic (Click to Download PDF )
Lap Counting
Lap Counter Schematic (Download PDF)

